Showing posts with label Gluten Free. Show all posts

Sunday, September 4, 2016

Crispy Baked Chicken Wings


Being gluten and dairy free means that there are some foods that I can never order at a restaurant.  Chicken wings are one of those foods.  Most restaurants deep fry their chicken wings in a fryer that is also used to deep fry breaded foods.  Which means the gluten from those other foods will get on anything that is put into the fryer. 

I am not a huge chicken wing fan, but when you haven’t been able to have a certain food for over 2 years, it starts to sound like the best food in the world!!

So a search began to find a chicken wing recipe I could make at home and bake in the oven to keep it a little healthier.  I stumbled across this recipe on Bon Appetit (it has to be good, right?) and gave it a whirl.  I made about 30 wings with it and left a few without the sauce for the kids.  Both girls gobbled these up and asked when we could have chicken wings for dinner again.  My husband also said they were good and definitely something to make again.  That’s a winner recipe in my book!

Ingredients:

Wings
30ish chicken wings & drumettes
2 tablespoons vegetable oil
1 tablespoon salt
½ tsp black pepper

Sauce
We love Red Hot but any hot sauce of your choosing

Directions:

Preheat oven to 400 degrees.  Place a wire racks inside 2 baking sheets.  Coat chicken wings with the oil, salt and pepper in a bowl.  Place coated chicken wings on the racks in rows with space in between.  Bake until wings are crispy, about 45-50 minutes. 

When the chicken wings are done toss in your sauce of choice until the wings are coated.  If you are not dairy free, serve with blue cheese and fresh veggies of your choice.  I made a dairy free ranch to go with ours.

Sunday, August 7, 2016

Fresh Berry Cups


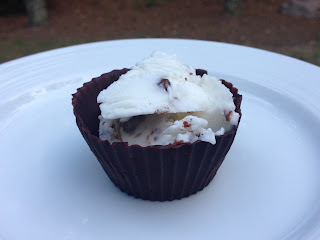
My friend Becca brought these beautiful desserts to my house a few months ago.  They are so pretty and after one bite, I was hooked.  We had family coming over for dinner and I needed a dessert that was nut, egg, dairy and gluten free.  This was perfect!  Adults and children gobbled these up, there wasn't one left.  The best part, I didn't have to turn on the oven!  :)  

They are chocolate cups filled with coconut cream topped with fresh raspberries and blueberries.  The only thing you need is silicone baking cups.  I bought these ones from amazon.  

Ingredients:
1 bag enjoy life chocolate chips (if you want to keep this dairy free)
2 cans full fat coconut milk
1 tsp vanilla
pinches of sugar to taste
fresh raspberries and blueberries

Directions:
Place cans of coconut milk in the refrigerator overnight.  This will help the coconut milk thicken and separate from the water.  

Melt the chocolate chips in a saucepan or double boiler until you have a smooth consistency.  

Coat the bottom and sides of your candy cup with about 1 spoonful of melted chocolate.  Place candy cups in the freezer.  


Remove chocolate cups from the freezer once firm and carefully pop the chocolate cups out of the silicone mold.  I did have a few of my edges break, but that's okay.  Doesn't effect the taste! I put my cups back in the freezer before filling as the chocolate was starting to get soft.

Remove the coconut milk from the refrigerator and scoop out the solid coconut cream at the top of the can and place in a large bowl.  Do not use the water at the bottom for this recipe.  I made quite a mess with this as coconut cream was flying everywhere when I was whipping it.  Maybe a stand mixer with a shield would be nice next time!

Add the vanilla and sugar to taste and start whipping your coconut cream until light and fluffy.  I had some very stubborn hard pieces in mine that didn't want to whip.  Keep whipping if that happens to you.  I also thought it was a little runny but it fluffed up nicely in the refrigerator.   

Once your cups are hard again, scoop some of your coconut filling into the chocolate cups.  Top each cup with a few raspberries and blueberries.  Refrigerate until you are ready to eat.  

This made 24 cups but I only had enough coconut cream for 18.  With the extra cups, we just put a scoop of dairy free ice cream in there!  Yum!


Monday, July 25, 2016

Spiced Cedar Plank Salmon


We have had cedar planks for grilling in our cabinet for years.  Still brand new, never been used.  Seemed like it was time to pull them out and give them a go.  They even had a recipe on the back, which is super convenient because I had no idea what seasonings to try since I've never grilled with a cedar plank before!  This turned out so good, one of my new favorite salmon recipes to make at home.  Finishing with the honey is what really made this salmon so good.  Wasn't too spicy for the kids either!

Rub
1 tablespoon brown sugar
1 teaspoon coarse salt
2 teaspoons ancho chili powder
1 teaspoon ground cumin
1/2 teaspoon black pepper
Salmon
4-6 ounce salmon filets
1 Fire & Flavor Cedar Grilling Plank, soaked for seveal hours
Honey for drizzling
First
Preheat grill to medium-low heat, about 350 F
Next
In a small mixing bowl, combine rub ingredients. Rub salmon with desired amount of rub and set aside.
Last
Place soaked plank on preheated grill, close lid, and heat for 3 minutes. Using tongs, turn plank over and place salmon on heated side of plank. Close lid and grill for 12-15 minutes or until desired doneness. Remove cedar planked salmon from grill and drizzle with desired amount of honey. Serve immediately.  

Enjoy!

Sunday, July 24, 2016

Peach Pie Struessel


I took two recipes and sort of combined them to get a peachy delicious dessert.  I have large jars of canned peaches that I made from a few years ago when we went peach picking.  They are great to use for any sort of peach pie or cobbler.  
Ingredients:

For the topping:

1 gluten free pie crust (I had a gluten free pie crust in the freezer I wanted to use up.) 

Large canned jar of peaches (if you don't have canned peaches, no worries.  Just use 5-6 cups of peaches, sliced, 3 T sugar, 3 T gluten free flour1 tsp cinnamon, mix the dry ingredients and toss with the peaches)
8T Earth's balance butter, cold

3/4 cup sugar
1 1/4 cup GF flour mix
1 tsp cinnamon
pinch nutmeg

Place dry ingredients into mixer.  Cut butter into 1 inch cubes.  Add to dry blend until desired consistency.


Directions:


Pour peaches onto the gluten free pie crust, drain if you are using canned.  Sprinkle the topping until you have covered the peaches.  You may have crumb topping left over - use for muffins or another pie!


Cover pie crust edges with aluminum foil so it doesn't burn.  I removed the foil and wished I would have left it on the whole time.  Gluten free crusts tend to get dried out quicker than regular and it was super crispy.


Bake in oven at 350 for 20-30 minutes or until topping is a nice golden brown and peaches are bubbly.    Serve with ice cream.  If you are trying to keep this dairy free, there are many choices for dairy free ice cream that are delish!

Saturday, July 23, 2016

Chocolate Peanut Butter Bars


I love chocolate and I love peanut butter and this recipe fits that craving perfectly!

Ingredients:
1.5 cups confectioners sugar, sifted
1.5 cups gluten/dairy free graham cracker crumbs (I used Kinnikinnick brand)
1 cup creamy peanut butter (I used some crunchy as I ran out of creamy)
8 tablespoons Earth Balance vegan "butter"
1 cup coconut cream
8 ounces dairy free chocolate chips (I use enjoy life)
1 tsp flaky sea salt (I wouldn't add this next time)

Directions:

Coat the bottom and sides of an 8x8 baking dish with nonstick spray, I use coconut oil.  In a large bowl, stir to combine the sugar, graham cracker crumbs and peanut butter and melted butter.  Press mixture into the baking dish and set aside.

Place chocolate and cream in a small saucepan.  Stir over medium heat until the chocolate has melted and is smooth.  Pour the melted chocolate over the peanut butter mixture and refrigerate until the chocolate is cooled and set, at least 45 minutes.  Sprinkle evenly with flaky sea salt.  Cut into squares and serve.

So happy with how this turned out!  Such a yummy and rich treat that I didn't have to turn the oven on for.  It kept well for over a week in the fridge.  Will definitely be making this one again soon!

Tuesday, May 31, 2016

Smokey White Bean and Ham Soup


I love a good soup and so does my oldest daughter.  She would eat some sort of homemade soup or chili night and day if I'd make it.  I came across this great recipe on What We're Eating and decided to give it a try.  We made this soup just after Easter to use up some of the ham we had left.  I made a bone broth with the leftover ham bones to use as the broth for this soup, but you can always use water if you don't have bones.  The original recipe calls for water and a ham hock - you can choose which you'd like to do.  I also used canned beans instead of dried.  Just personal preference here!

Ingredients:

1 1/2 tbsp canola oil
1 yellow onion, diced
1 carrot, diced
2 stalks celery, diced
2 cloves garlic, minced
1 sprig rosemary
1/4 cup fresh parsley, chopped
1 bay leaf
1/2 tsp dried basil
1/2 tsp dried oregano
1 lb dried small white beans, rinsed and picked through (you can also use canned, I did)
1 lb ham steak, fat removed then diced
1 smoked ham hock (I didn't use this b/c I used the bone broth)
10 cups of water, plus extra if needed (I used as much bone broth as I could, then water)
kosher salt and freshly cracked black pepper

Directions:

Place a large pot over medium heat. Add oil to pot. Once the oil is hot, add diced onions, carrots, and celery to the pot. Stir. Saute over medium heat for 10-15 minutes, stirring occasionally, until the onions are translucent and the carrots are softened.

Add the dried white beans, garlic, bay leaf, dried oregano & basil to the pot. Stir and cook for another 3-4 minutes.

Add the ham hock, diced ham, parsley and rosemary sprig to the pot. Cover the ingredients with about 8 cups of water. Add 1 tsp kosher salt and 1/2 tsp freshly cracked black pepper. Stir.

Raise heat to high and bring soup to a boil. Once you reach a boil, reduce heat to medium low. Simmer soup over medium low heat for 2 - 2 1/2 hours until the beans are tender. If soup starts to get too thick, add a bit more water.

Once beans are soft, remove the ham hock and rosemary sprig. Taste then season as necessary with kosher salt and freshly cracked black pepper. 

Monday, May 30, 2016

Chopped Mexican Salad with Roasted Peppers, Corn, Tomatoes & Avocado


I found this recipe in a Fine Cooking Fresh magazine from 2008.  Nothing needed to be adjust for gluten/dairy free diet and it tastes amazing!  This is salad is a great side salad to any grilled meat.  We've served it with ribs but it could also be used as an appetizer and eaten with tortilla chips.  Even my 8 year old gobbled this up!

Make sure you give yourself some time, the corn and peppers need to roast in the oven for 20 minutes.

Ingredients:
2 large orange peppers
2 ears fresh corn (you can used canned corn if you are short on time)
1 tbsp olive oil
1 small clove garlic
3 Tbsp lime juice
3 Tbsp orange juice
2 tsp finely chopped shallot
1 Tbsp honey
3/4 tsp cumin seeds, toasted and finely ground (I just just used cumin powder)
1/4 cup olive oil
2 large firm ripe tomatoes, cored, seeded and cut into a small dice
1 small jicama, peeled and cut into small dice (I left this out b/c the jicama I bought tasted off, would add next time)
2 large firm ripe avocados, peeled, pitted and cut into a small dice
1 can 15 oz black beans, drained and rinsed
1/4 cup coarsely chopped fresh cilantro

Directions:

Roast the peppers and corn:  Preheat oven to 425 degrees.  Line cookie sheet with aluminum foil.  Cut the peppers in half lengthwise and remove the stem, seed core, and ribs.  Put the pepper halves on the baking sheet, cut side down.  Husk the corn and put the ears on the baking sheet.  Drizzle the oil over the peppers and corn and rub it around to coat them evenly.  Sprinkle the corn with salt and pepper.  Roast in the oven until the peppers are soft, slightly shriveled and browned, about 20 minutes.  Rotate the corn occasionally as it roasts.

When the vegetables are done, let them rest until cool enough to handle.  Scrape away the pepper skin and cut the flesh into 1/2 inch dice.  Cut the corn kernels away from the cob.

Make the vinaigrette:  Mince and mash the garlic to a paste with 1/4 tsp salt.  In a medium bowl, whisk the garlic paste with the lime and orange juices, shallot, honey and toasted ground cumin.  Slowly add the oil in a thin stream, whisking until well blended.  Season to taste with black pepper and more salt and honey if you like.

Assemble the salad:  Place peppers, corn, tomatoes, jicama, avocados, and place beans in a small platter or other wide shallow serving dish.  Sprinkle with the chopped cilantro.  You can allow each guest to pour the vinaigrette on their own plate or drizzle the vinaigrette over the salad platter before serving, which is what I did.

Sunday, November 8, 2015

Sweet Potato Pizza


A family member sent me this recipe when I first found out that I couldn't eat gluten anymore.  It's from iFOODreal.com and if you love sweet potatoes, definitely give this a try.  Whether you eat gluten or not.  Mine didn't turn out like pizza though.  I felt it was more like a eggplant parmesan but with sweet potatoes instead of the eggplant.  Seriously delicious though.  I ate half the pan in one sitting!

Below has the changes to the recipe that I made.  To see the original, click here.  

Ingredients:
3 sweet potatoes
1 tbsp olive oil
1 garlic clove, minced
1/2 tsp paprika
1/2 tsp salt
1/2 tsp black pepper
2.5 oz mozzarella cheese (to keep this dairy free I used Vegan Gormet Shreds, melts nicely)

Toppings: really whatever you like, here is what I did
1/2 pound ground sausage
handful chopped broccoli (not sure I'd add this again with the meat)
sliced mushrooms
cooking spray
3/4 cup pizza sauce

Directions:
Preheat oven to 450 degrees.  Spray baking tray with cooking spray.  Wash and dry sweet potatoes.  Cut off the ends.  Slice each potato lengthwise into 1/8 of an inch thick slices.  I tried using my mandoline for these but really struggled getting them sliced all the way through.  So I ended up doing most of them by hand.  Put in a large bowl and toss with olive oil, garlic, paprika, salt and pepper.  

Lay potato slices in a single layer, making sure they overlap by 1/8 of an inch.  

Add your veggies.  Spray the veggies with cooking spray and sprinkle with salt and pepper.  Bake for 20 minutes.  


While the potatoes and veggies are in the oven, start cooking your sausage until completely cooked through.  

After the sweet potatoes have been baked for 20 minutes, pull them out and sprinkle with a handful of your cheese.  Drizzle tomato sauce on top.  Sprinkle turkey pieces and cover with remaining cheese.  Return pizza to oven and broil on hight for 8-10 minutes until cheese is bubbly.  

Cut into slices and serve. 

Mine did not hold together enough to be able to pick it up and eat it with your hands.  We ate ours with a knife and fork.  The next day, while cold, it was much easier to pick up and eat with your hands.  This was a great dinner and would even be good served as an appetizer.  I am looking forward to making this again and playing with the toppings.  Yum!

Enjoy!

Wednesday, November 4, 2015

Asian Grilled Salmon


I had this salmon at a friends house last summer.  It is now my favorite way to make salmon at home.  The recipe is from Ina Garten on Food Network.  It's super easy but very flavorful.  I could never figure out why I couldn't get salmon at home to taste as good as salmon in restaurants.  Well, this recipe taught me that I've been over cooking salmon.  Way over cooking it!  :)

Ingredients:
3 pounds salmon, skin on, cut into 4 pieces
2 Tablespoons Dijon mustard
3 Tablespoons soy sauce (use gluten free soy sauce or coconut aminos as a soy substitute)
6 Tablespoons olive oil
1/2 tsp minced garlic

Directions:
Light grill.  Brush grilling rack with olive oil to prevent salmon from sticking.

Whisk together mustard, soy sauce, oil and garlic.  Drizzle half of the marinade on the salmon and allow it to sit for 10 minutes.

Now, as reading the original directions, they state to put the salmon skin side down on the grill.  I've always put it flesh side down to get the nice grill marks and never had problems doing it that way.   So that is the way I will write to do it in recipe. Feel free to do it as you wish!  :)

Place salmon flesh side down.  Grill for 4-5 minutes.  Turn carefully, not flip and grill for another 4-5 minutes.  The salmon will be slightly raw in the center.  Spoon reserved marinade over the top of salmon.  Allow to sit for 10 minutes, it will keep cooking as it sits.  Serve with rice and a salad.

Saturday, September 26, 2015

Jambalaya


My husband made a comment the other day that my cooking is distinct.  Meaning I tend to cook the same way all the time.  When I asked him to clarify he said, "You always do some sort of meat with a rub, a complex side and a simple side."  Well.  I don't know why, but that rubbed me the wrong way.  I don't want my cooking to be "distinct"!  Honestly, I don't feel it is but his perception is his reality - so off I went to find a recipe that was out of my normal cooking methods.

I stumbled across this jambalaya recipe and thought it looked delicious and fit the not my typical distinct way of cooking.  :)

This was too spicy for the kids so if you have a family you'll need to make something different for them.  We had left over pasta e fagioli so that is what our kids ate.  You can control the amount of heat that goes into this dish.  The recipe below is how I made it to my liking.

There is a lot of chopping in this recipe.  It took me about an hour and a half from start to finish.  A little long for a weeknight meal.  Would be great to make on Sunday and have to eat during the week.  It makes a ton!

Ingredients:
3 tbsp olive oil
2 ribs celery, chopped
1 white onion, diced
1 small red bell pepper, diced
1 small yellow bell pepper, diced
1 small green bell pepper, diced
1 jalapeño finely chopped, with seeds (you can put in 2 jalapeños if you want more heat or leave the seeds out if you want less) 
4 cloves garlic, minced
2 boneless skinless chicken breasts, cut into bite sized pieces
1 lb andouille sausage, sliced into rounds, precooked
3 cups chicken stock
1 14 oz can crushed or diced tomatoes
1 1/2 uncooked white rice
1 tbsp cajun or creole seasoning (I used cajun as that is what I had on hand.  If you want a more heavily seasoned jambalaya, add another Tablespoon)
1 bay leaf
1 tsp thyme, crushed
1/4 tsp cayenne pepper
1 lb raw shrimp, peeled and deveined
1 cup thinly sliced okra
salt and pepper
thinly sliced green onions
hot sauce

Directions:


Heat 2 tablespoons. olive oil in a large saute pan over medium-high heat. Add celery, onion, bell peppers, jalapeno and garlic. Saute for about 5 minutes, stirring occasionally, until the vegetables are soft and mostly cooked. Add the remaining tablespoon of olive oil, chicken and sausage, and stir to combine. Continue sautéing for an additional 5 minutes, or until the chicken is no longer pink and mostly cooked.
Add the chicken stock, tomatoes, rice, Cajun spice, bay leaf, thyme, and cayenne, and stir to combine. Reduce heat to medium-low, cover and simmer for about 25-30 minutes, or until the rice is cooked, stirring occasionally. (Don't forget to stir, or the rice may burn on the bottom of the pan.)
Once the rice is tender, add in the shrimp and okra and stir to combine. Let the mixture continue to simmer, stirring occasionally, until the shrimp are cooked and no longer pink. Remove bay leaf and season the jambalaya with salt and pepper and hot sauce and additional Cajun/Creole seasoning if needed. Remove from heat and serve with sliced green onion.
I did not need to add additional seasoning for my tastes.  My husband did add hot sauce to his bowl.  

Thursday, September 17, 2015

Pumpkin Chili


Once we get close to Fall, it seems all the food in the stores start showing up as pumpkin this and pumpkin that.  I am going to jump on that bandwagon too, but I want REAL pumpkin in the food I'm eating.  Not just flavored to taste like pumpkin.  Pumpkin is really healthy for you.  It's loaded with fiber, vitamin C and beta carotene, which converts to vitamin A in our bodies.  If you are using a canned pumpkin, just make sure to not grab the canned pumpkin pie filling as that has a ton of added sugar.

My friend Maureen told me about this recipe from Wellness Mama last year and it is such a yummy recipe.  I doubled the recipe this time otherwise my family of 4 eats it all in one night with nothing leftover.  My oldest daughter has requested this in her lunch at school for the past two days.  She loves it and it keeps her fuller longer, plus I know it's packed full of veggies and nutrients her body needs!

Ingredients: (doubled version)
2 pounds ground beef (we use grass fed)
4 onions (I felt like this was too many onions.  Husband and daughter thought it was fine but if you're not a big onion fan keep it to 2)
2 cans diced tomatoes (16oz each)
2 cans tomato sauce (15 oz each)
2 cans pureed pumpkin (15 oz each)
2 cups beef broth (read labels for gluten if you want this to be gluten free)
2 tbsp chili powder
4 tsp garlic powder
2 tsp salt
2 tsp black pepper
1 tsp cinnamon
1 avocado (garnish)
cheese and sour cream (garnish and use vegan to keep dairy free)
sliced green onions (garnish, and I forgot these)

Directions:
Brown the beef in a large pot.  While beef is browning dice your onions.  Add onions to the pot and cook until soft.  Add the pumpkin, diced tomatoes, tomato sauce, stock and spices.  Stir to combine.  Simmer for 10-15 minutes or until heated through.  I usually keep on low for 30 minutes to really give the flavors some time to meld together.  Served topped with shredded cheese, sour cream and diced avocados.

Saturday, September 12, 2015

Dairy & Gluten Free Banana Bread


Baking without gluten can sometimes be a challenge.  Consistency is different or the texture is off.  There is definitely a trial and error process to go through while finding the right flours that are as close to wheat flour as you can get.  I am still searching for that perfect mixture but have come across some pretty yummy recipes along the way!

Take this banana bread for example.  When I put a dairy free/gluten free item in the oven, I never really know what I am going to get when I pull it out.  This bread got really dark on the outside very quickly, even though it still needed more cooking on the inside.  I would recommend cooking it at a lower temperature next time, maybe 325 instead of 350.  Even though the outside was much darker than I normally make with wheat banana bread, it didn't really change the taste.  Texture was great, had nice flavor - honestly, I couldn't tell it was gluten/dairy free, which is exactly how I want it to be!  My 5 year old daughter has been eating it for snack and hasn't said a peep, so if she can't tell and thinks it's yummy then that's a successful baking experience!

Ingredients:
5 Tablespoons butter (use vegan butter sticks to keep this dairy free)
1/2 cup white sugar
1/2 brown sugar
1 tsp vanilla extract
1 1/2 cups mashed banana (about 2 large bananas)
1 3/4 cup gluten free flour
1 teaspoon baking soda
1/2 teaspoon salt
1/4 teaspoon baking powder
2 eggs
1/2 cup coconut milk

Directions:
Preheat the oven to 350 degrees (or if you want to try 325). Grease a 9x5 loaf pan with cooking spray. Beat butter in a large bowl. Add sugars, blend. Add eggs and vanilla; blend. Add mashed banana; blend.

Add dry ingreditents, blend.  Slowly add coconut milk, mix until combined.

Pour batter into loaf pan. Bake until brown and when toothpick comes out clean when inserted into center. This bread needs to bake for about an hour in the oven.  I like to check around 50 minutes and if it needs more add 10 minutes each time to prevent it from over cooking.  My loaf got very brown on the outside but the inside was still a bit raw.  Next time I would reduce heat to 325 to try to keep the outside from getting so dark.  This bread was in the oven for about 60 minutes total.   


Enjoy!

Thursday, September 10, 2015

Black Bean Soup


We have some black bean lovers in our family.  If I make a soup or chili, one of my children will just eat the beans out of it.  So why not make a soup that is all beans?  Both girls loved this recipe and told me I needed to make it more often. If the 5 and 7 year old are happy,  I call that recipe a winner!

Next time I will probably double the recipe for our family of four.  We didn't have enough left over for another full meal.  But it is a very good recipe.  The lime and cilantro addition at the end are a very nice touch.  And it has bacon in it.  It's got to be good, right!

Ingredients:

10 slices bacon, chopped
2 1/2 cups onions, chopped
6 garlic cloves, pressed
14.5 ounces chicken broth (use gluten free brand to keep this a gluten free dish)
1 can diced tomatoes
2 tbsp ketchup
2 tsp Worcestershire sauce
1 tbsp chili powder
4 cans black beans
salt and freshly ground black pepper
1 bunch cilantro
juice of 1/2 a lime
thinly sliced scallions
sour cream (use vegan sour cream to keep this dairy free)
grated cheddar cheese (use vegan cheese to keep this dairy free)

Directions:

Cook bacon in a large heavy pot over medium heat.  Cook until  crisp.  Stir in the onions and cook until they turn translucent, about 4 minutes.  Stir in the garlic and cook for about 1 minute.  Add the broth, tomatoes, ketchup, Worcestershire and chili powder.  Stir in the beans, turn the heat up to high and bring to a boil.  Once the soup is bubbling gently, turn heat down to about medium and cook for 10 minutes.  Season with salt and pepper to taste.

While the soup is cooking, wash and chop cilantro coarsley.  Stir it into the soup after it has cooked for 10 minutes.  Cook until the soup has thickened, about another 5 minutes.  Stir in the lime juice.  Serve with scallions sprinkled on top, grated cheese and a dollop of sour cream.

Enjoy!

Sunday, August 30, 2015

Avocado Caprese Salad


Caprese salads are my favorite.  But now that I am dairy free, I can't eat it anymore.   I saw this recipe that subbed avocado for the cheese.  Brilliant!  We used fresh tomatoes and basil from our garden and served it as a salad with dinner.  But it would be great served as an appetizer for a party as well.  Definitely a keeper!

Ingredients:
medium tomatoes
avocado
olive oil
salt and pepper
fresh basil

Directions:

Cut the avocado around the equator, remove pit and peel.  Cut into small rounds.  Slice the tomato and salt lightly.

Layer the tomatoes, avocado and basil leaves.  Drizzle with olive oil, sprinkle with salt and fresh ground pepper.  Serve immediately.

Enjoy!


Monday, July 27, 2015

Buffalo Cauliflower "Wings"


Not being able to eat fried foods can be hard sometimes.  I didn't eat it all that much but not ever being able to eat it - unless I make my own - can be a bummer.  Occasionally I will get a craving for something fried and spicy.  These buffalo cauliflower wings hit the spot.  They aren't breaded and fried, but sautéed in a pan.  So good.   

Ingredients:

1 head of cauliflower
1/2 cup Frank's Red Hot Sauce
1/4 cup sriracha
1 Tbsp unsalted butter (I used vegan butter)
olive oil
salt and pepper to taste

Directions:

Preheat oven to 375 degrees.  Line a baking sheet with aluminum foil.  Rinse the cauliflower and remove the woody stem and leaves at the base.  Drizzle olive oil onto the whole cauliflower, underside as well.  Sprinkle with salt and pepper and bake in the oven for 30-35 minutes on the lined baking sheet.  

Remove from oven and allow to cool for a few minutes.  

While the cauliflower is cooling, combine the hot sauce, sriacha and butter in a small saucepan over medium heat.  Stir until butter is melted, cook on low until sauce simmers.  Remove from heat.  

Separate the cauliflower into large florets.  Place 1-2 Tbsp olive oil into a large skillet over medium heat.  When the oil is hot, add the cauliflower florets and pan fry for 5 minutes without stirring.  

Pour the hot sauce into the skillet with the cauliflower - the sauce will sizzle and thicken.  Stir gently to coat the cauliflower in buffalo sauce.  


When the cauliflower is fully coated and the sauce has reduced slightly, turn off the heat serve. 

This would be great as an appetizer at a party.  We used it as a side dish with pork chops.  

I drizzled mine with a dairy free ranch dressing.  I'll post that recipe soon.  

Enjoy!


Friday, July 10, 2015

Fried Cabbage


Fried cabbage might not photograph well, but it is super yummy.  I found this great recipe for a different use for cabbage as a side.  I always tend to make cole slaw with cabbage.  Never thought to saute it!

Ingredients:
1 bag shredded cabbage - or you can shred your own
3-5 slices of bacon
1 onion chopped
2 T butter (I use Earth Balance vegan butter to keep this dairy free)
dash of apple cider vinegar
salt and pepper to taste

Directions:

Chop up the bacon and cook in a medium sized pan until crispy.

Add in 2 T of whatever type of butter you are using and the chopped onion.  Throw in about 1 T water to deglaze the pan and saute for 4 minutes.

Turn the heat to low and add in the cabbage.  Cover and cook for 30 minutes, stirring occasionally.  Turn of the heat and add the remaining 2 T of butter and the dash or two of apple cider vinegar.  Salt and pepper to taste.  Add more apple cider vinegar to taste as well.

Serve and enjoy!


Friday, May 29, 2015

Chocolate Crinkle Cookies {Gluten & Dairy Free}


People hear the words "gluten free" and instantly think, gross.  So I have stopped telling them it's gluten free until after they've eaten.  And raved about how good it is.  Gluten free, baby.  ;)

This recipe is no exception.  In fact, these are to die for.  No grains whatsoever.

The key to not being able to eat what the majority of the population eats, is to have things on hand that you can have.  These will become a regular sweet in our house!

Ingredients:
1 1/2 cups bittersweet chocolate chips, divided {I use these so they are dairy free}
3 large egg whites
2 cups powdered sugar, divided
1/2 cup unsweetened cocoa powder
1 Tbsp cornstarch
1/4 tsp salt

Directions:
Preheat oven to 350 degrees.  Spray 2 large baking sheets with nonstick spray, or use a silpat liner.  Melt 1 cup chocolate chips in microwave, stirring twice, about two minutes.  Cool.

Using electric mixer, beat whites in a large bowl to soft peaks.  Gradually beat in 1/2 cup powdered sugar.  Continue beating until mixture resembles soft marshmallow creme.

Wisk 1 cup powdered sugar, cocoa, cornstarch and salt in medium bowl to blend.  On low speed, beat dry ingredients into meringue.

Stir in lukewarm chocolate and 1/2 cup chocolate chips.  Refrigerate until dough is stiff.  Place 1/2 cup powdered sugar in a bowl.  Roll 1 rounded tablespoon into a ball; roll in sugar, coating thickly.  Place on prepared baking sheet.  Repeat with remaining dough; spacing 2 inches apart.  Bake until puffed and tops crack, about 10 minutes.  Cool before removing.

Try not to eat the whole sheet.  But I won't judge you if you do.  :)

Monday, April 13, 2015

Peep Surprise Cupcakes


These are a super easy and fun baking treat to do with your children.  My girls were able to help with pretty much every aspect of the baking and decorating which is important.  

Ingredients:
1 box of your favorite yellow cake mix (King Arthur's Yellow GF Mix)
water/vegetable oil and eggs called for on the box
bag of peanut butter m&m candy & sprinkles if desired
1 container white frosting
green food coloring
24 PEEPS® brand marshmallow chicks

Directions:

Heat oven to 350 degrees.  Place paper baking cup in regular sized muffin tin.  
Make cake batter as directed on box.  Divide batter evenly among muffin tins, about 2/3 full.  Bake as directed on box for cupcakes, 5 minutes less for GF.  Cool in pans 10 minutes, remove from tins and cool completely.

Using a small kitchen knife, scoop out center of each cupcake, about 1 inch deep.  Fill each with 1 candy egg and sprinkles.  

Spoon frosting into a bowl.  Stir in enough green food coloring until you have the desired green color.  Frost cupcakes and top with a marshmallow peep.  

All the kids that ate these loved them.  Especially the surprise inside the cupcake.  A few adults thought they were pretty delicious too!

Friday, February 20, 2015

Chicken and Kale Soup


Yum.  This is by far the best chicken soup I have ever had.  I made chicken bone broth and used it in the soup.  Pretty sure that is why this soup turned out so delicious.  The only downfall is that it didn't make enough!  It was plenty to feed my family of four but I like to have leftovers for lunch the next day.  Definitely no leftovers here!  Next time I'd double the recipe.

Ingredients:

  • 32 ounces organic chicken broth - highly recommend making your own.  Click here for a recipe.
  • 4-5 stalks celery, sliced
  • 3 organic carrots, sliced
  • 1 yellow onion, diced
  • 4-5 stalks of kale, chopped fine, including the stems
  • large chicken breast, sliced into strips
  • sea salt and pepper
Directions:

Put all ingredients except kale into a large pot and simmer for 45 minutes or until chicken is cooked.  Strain the chicken out and shred with 2 forks.  Put back into soup and toss in the kale.  Simmer for another 4-5 minutes or until kale is tender.  

The girls and I ate this soup as is.  My husband got home late and tossed in some cooked spiral noodles (gluten free of course) as well.  Would be a nice addition to if you want something a little more filling.  


Enjoy!

Tuesday, February 17, 2015

Gluten & Dairy Free Chocolate Chip Cookies


My family gave me a gluten free cook book for Christmas and my girls were really wanting to try a recipe from it.  We found a chocolate chip cookie recipe and decided to give it a go.  I made a few changes, one being using a gluten free baking flour mix.  

So the girls loved these.  I thought it was a good base recipe but needed work.  They were very sugary - almost like a sugar cookie with chocolate chips.  The girls thought that because they were gluten free that they were healthy.  No, with all that sugar, definitely not healthy but cookies that mommy can eat!

Ingredients:
1 cup vegetable shortening (next time I will try bacon grease)
1 cup granulated sugar (Would cut back to 1/2 cup next time)
1/2 brown sugar
2 eggs
1 1/2 tsp baking soda
2 cups plus 2 Tablespoons flour mixture
1/2 tsp salt
12 oz chocolate chips

Directions:

Preheat oven to 375 degrees.  Lightly grease cookie sheet or use a silpat baking mat.  

Beat shortening and sugars with an electric mixer.  Add eggs and vanilla and beat until combined.  

Add dry ingredients, mix until combined.  Add chocolate chips and stir.

Drop heaping spoonfuls of dough onto cookie sheet.  Bake for 8-10 minutes until light golden brown.  I had to cook for 10 minutes in my oven.  Cool cookies on tray for 2 minutes before transferring to a wire rack to cool completely.