Showing posts with label Dairy Free. Show all posts

Sunday, September 4, 2016

Crispy Baked Chicken Wings


Being gluten and dairy free means that there are some foods that I can never order at a restaurant.  Chicken wings are one of those foods.  Most restaurants deep fry their chicken wings in a fryer that is also used to deep fry breaded foods.  Which means the gluten from those other foods will get on anything that is put into the fryer. 

I am not a huge chicken wing fan, but when you haven’t been able to have a certain food for over 2 years, it starts to sound like the best food in the world!!

So a search began to find a chicken wing recipe I could make at home and bake in the oven to keep it a little healthier.  I stumbled across this recipe on Bon Appetit (it has to be good, right?) and gave it a whirl.  I made about 30 wings with it and left a few without the sauce for the kids.  Both girls gobbled these up and asked when we could have chicken wings for dinner again.  My husband also said they were good and definitely something to make again.  That’s a winner recipe in my book!

Ingredients:

Wings
30ish chicken wings & drumettes
2 tablespoons vegetable oil
1 tablespoon salt
½ tsp black pepper

Sauce
We love Red Hot but any hot sauce of your choosing

Directions:

Preheat oven to 400 degrees.  Place a wire racks inside 2 baking sheets.  Coat chicken wings with the oil, salt and pepper in a bowl.  Place coated chicken wings on the racks in rows with space in between.  Bake until wings are crispy, about 45-50 minutes. 

When the chicken wings are done toss in your sauce of choice until the wings are coated.  If you are not dairy free, serve with blue cheese and fresh veggies of your choice.  I made a dairy free ranch to go with ours.

Sunday, August 7, 2016

Fresh Berry Cups


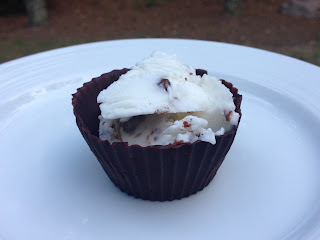
My friend Becca brought these beautiful desserts to my house a few months ago.  They are so pretty and after one bite, I was hooked.  We had family coming over for dinner and I needed a dessert that was nut, egg, dairy and gluten free.  This was perfect!  Adults and children gobbled these up, there wasn't one left.  The best part, I didn't have to turn on the oven!  :)  

They are chocolate cups filled with coconut cream topped with fresh raspberries and blueberries.  The only thing you need is silicone baking cups.  I bought these ones from amazon.  

Ingredients:
1 bag enjoy life chocolate chips (if you want to keep this dairy free)
2 cans full fat coconut milk
1 tsp vanilla
pinches of sugar to taste
fresh raspberries and blueberries

Directions:
Place cans of coconut milk in the refrigerator overnight.  This will help the coconut milk thicken and separate from the water.  

Melt the chocolate chips in a saucepan or double boiler until you have a smooth consistency.  

Coat the bottom and sides of your candy cup with about 1 spoonful of melted chocolate.  Place candy cups in the freezer.  


Remove chocolate cups from the freezer once firm and carefully pop the chocolate cups out of the silicone mold.  I did have a few of my edges break, but that's okay.  Doesn't effect the taste! I put my cups back in the freezer before filling as the chocolate was starting to get soft.

Remove the coconut milk from the refrigerator and scoop out the solid coconut cream at the top of the can and place in a large bowl.  Do not use the water at the bottom for this recipe.  I made quite a mess with this as coconut cream was flying everywhere when I was whipping it.  Maybe a stand mixer with a shield would be nice next time!

Add the vanilla and sugar to taste and start whipping your coconut cream until light and fluffy.  I had some very stubborn hard pieces in mine that didn't want to whip.  Keep whipping if that happens to you.  I also thought it was a little runny but it fluffed up nicely in the refrigerator.   

Once your cups are hard again, scoop some of your coconut filling into the chocolate cups.  Top each cup with a few raspberries and blueberries.  Refrigerate until you are ready to eat.  

This made 24 cups but I only had enough coconut cream for 18.  With the extra cups, we just put a scoop of dairy free ice cream in there!  Yum!


Monday, July 25, 2016

Spiced Cedar Plank Salmon


We have had cedar planks for grilling in our cabinet for years.  Still brand new, never been used.  Seemed like it was time to pull them out and give them a go.  They even had a recipe on the back, which is super convenient because I had no idea what seasonings to try since I've never grilled with a cedar plank before!  This turned out so good, one of my new favorite salmon recipes to make at home.  Finishing with the honey is what really made this salmon so good.  Wasn't too spicy for the kids either!

Rub
1 tablespoon brown sugar
1 teaspoon coarse salt
2 teaspoons ancho chili powder
1 teaspoon ground cumin
1/2 teaspoon black pepper
Salmon
4-6 ounce salmon filets
1 Fire & Flavor Cedar Grilling Plank, soaked for seveal hours
Honey for drizzling
First
Preheat grill to medium-low heat, about 350 F
Next
In a small mixing bowl, combine rub ingredients. Rub salmon with desired amount of rub and set aside.
Last
Place soaked plank on preheated grill, close lid, and heat for 3 minutes. Using tongs, turn plank over and place salmon on heated side of plank. Close lid and grill for 12-15 minutes or until desired doneness. Remove cedar planked salmon from grill and drizzle with desired amount of honey. Serve immediately.  

Enjoy!

Sunday, July 24, 2016

Peach Pie Struessel


I took two recipes and sort of combined them to get a peachy delicious dessert.  I have large jars of canned peaches that I made from a few years ago when we went peach picking.  They are great to use for any sort of peach pie or cobbler.  
Ingredients:

For the topping:

1 gluten free pie crust (I had a gluten free pie crust in the freezer I wanted to use up.) 

Large canned jar of peaches (if you don't have canned peaches, no worries.  Just use 5-6 cups of peaches, sliced, 3 T sugar, 3 T gluten free flour1 tsp cinnamon, mix the dry ingredients and toss with the peaches)
8T Earth's balance butter, cold

3/4 cup sugar
1 1/4 cup GF flour mix
1 tsp cinnamon
pinch nutmeg

Place dry ingredients into mixer.  Cut butter into 1 inch cubes.  Add to dry blend until desired consistency.


Directions:


Pour peaches onto the gluten free pie crust, drain if you are using canned.  Sprinkle the topping until you have covered the peaches.  You may have crumb topping left over - use for muffins or another pie!


Cover pie crust edges with aluminum foil so it doesn't burn.  I removed the foil and wished I would have left it on the whole time.  Gluten free crusts tend to get dried out quicker than regular and it was super crispy.


Bake in oven at 350 for 20-30 minutes or until topping is a nice golden brown and peaches are bubbly.    Serve with ice cream.  If you are trying to keep this dairy free, there are many choices for dairy free ice cream that are delish!